Build an Automatic Night Lamp with Arduino

Welcome to this beginner-friendly tutorial by Madras Academy, where you'll learn how to create an automatic night light using Arduino and an LDR (Light Dependent Resistor). This practical project is perfect for students and hobbyists interested in home automation and sensor applications.
In this tutorial, you will:
- Understand how to use an LDR with Arduino for light detection
- Build a complete circuit for an automatic night lamp
- Write simple Arduino code to control an LED based on ambient light
- Learn practical applications of sensors and automation
This project automatically turns an LED on when it gets dark and off when there's sufficient light - a perfect introduction to smart home technology!
👉 Use the tabs below to navigate through the project:
- Project Info & Demo – Watch the finished result and learn what you'll build.
- Wiring & Code – Get the circuit diagram, list of components, and the complete Arduino code.
- Notebook & Help – Access a printable project log and get troubleshooting tips.
Let's build a smarter light that works automatically!
📌 Project Information
- Title: Automatic Night Lamp with Arduino
- Difficulty: Beginner
- Build Time: 15-20 minutes
- Skills Gained: Sensor integration, conditional logic, automation
🎬 Demo Video
Watch the project in action below:
🧰 Components List
This project requires just a few basic components to create your automatic night lamp. Here's what you'll need:
Essential components:
- Arduino Uno/Mega: The microcontroller board that will process the sensor data
- LDR (Light Dependent Resistor): Detects ambient light levels
- 10K ohm Resistor: Forms a voltage divider with the LDR
- LED: The lamp that turns on automatically
- 220 ohm Resistor: Current limiter for the LED
- Breadboard & Jumper Wires: For easy circuit assembly
| Component | Quantity | Description |
|---|---|---|
| Arduino Uno/Mega | 1 | Main controller board |
| LDR | 1 | Light Dependent Resistor |
| 10K ohm Resistor | 1 | For voltage divider |
| LED | 1 | Any color |
| 220 ohm Resistor | 1 | For LED current limiting |
| Breadboard | 1 | For building the circuit |
| Jumper Wires | 5-7 | For connections |
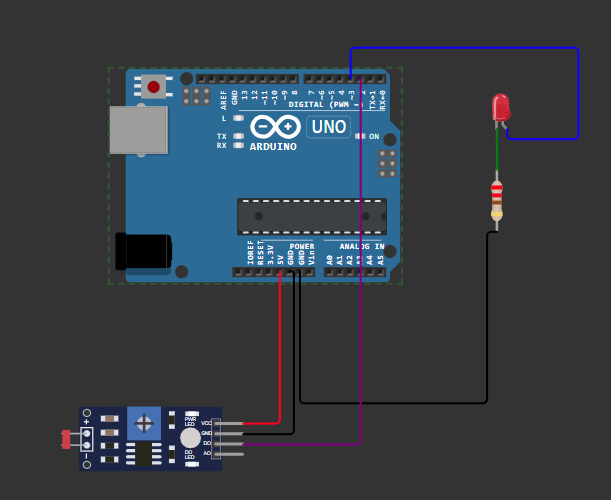
🔌 Circuit Diagram
💻 Arduino Code Example
int ldrPin = A0;    // LDR connected to A0
int ledPin = 13;   // LED connected to digital pin 13
int threshold = 500; // Adjust this value based on testing

void setup() {
    pinMode(ledPin, OUTPUT);
    Serial.begin(9600); // For debugging
}

void loop() {
    int ldrValue = analogRead(ldrPin); // Read LDR value
    Serial.println(ldrValue); // Print value for calibration

    if (ldrValue < threshold) {
        digitalWrite(ledPin, HIGH); // Turn LED ON if dark
    } else {
        digitalWrite(ledPin, LOW);  // Turn LED OFF if bright
    }
    delay(100); // Small delay for stability
}
Note: You may need to adjust the threshold value based on your environment. Open the Serial Monitor to see the LDR readings.
📘 Project Notebook Template
- Project Title: _________________________
- Date: _________________________
- My Objective: _________________________
- Materials I Used: _________________________
- Circuit Diagram: _________________________
- My Custom Pattern Idea: _________________________
- What I Learned: _________________________
- Challenges I Solved: _________________________
🛠 Troubleshooting Tips
- ✅ Check LDR orientation (it's not polarized but must be in voltage divider)
- ✅ Use Serial Monitor to check LDR values and adjust threshold
- ✅ Test LED separately to verify it works
- ✅ Try different threshold values for different lighting conditions
🎓 Learn More
Enhance your skills with our Arduino Sensors Course: https://www.madrasacademy.com/cool-tech-projects-arduino-sensors-course
- Duration: 1 Week
- Total Lectures: 15
- Capacity: Max 50
- Difficulty Level: Advanced
- Medium of Instruction: English
Project Cost
₹1,500 ₹3,000